We collect basic website visitor information on this website and store it in cookies. We also utilize Google Analytics to track page view information to assist us in improving our website.
Spring Season starting to book up. Promotions Available for Winter.

With the sun shining more often, we’re all looking forward to what it bodes for us: spring. But before you leap into action and start watering the lawn, ensure your sprinkler system (hopefully winterized) is working well.
Sprinklers, especially automated ones, are great helpers for gardeners. You can set the watering system to turn on at a time allowed by your town or city. And you can program it to turn off after a while so you’re not wasting water, a precious commodity now.
Sprinkler systems can be installed above ground for easier access to the pipes, or underground if you’d rather not look at the network of metal.
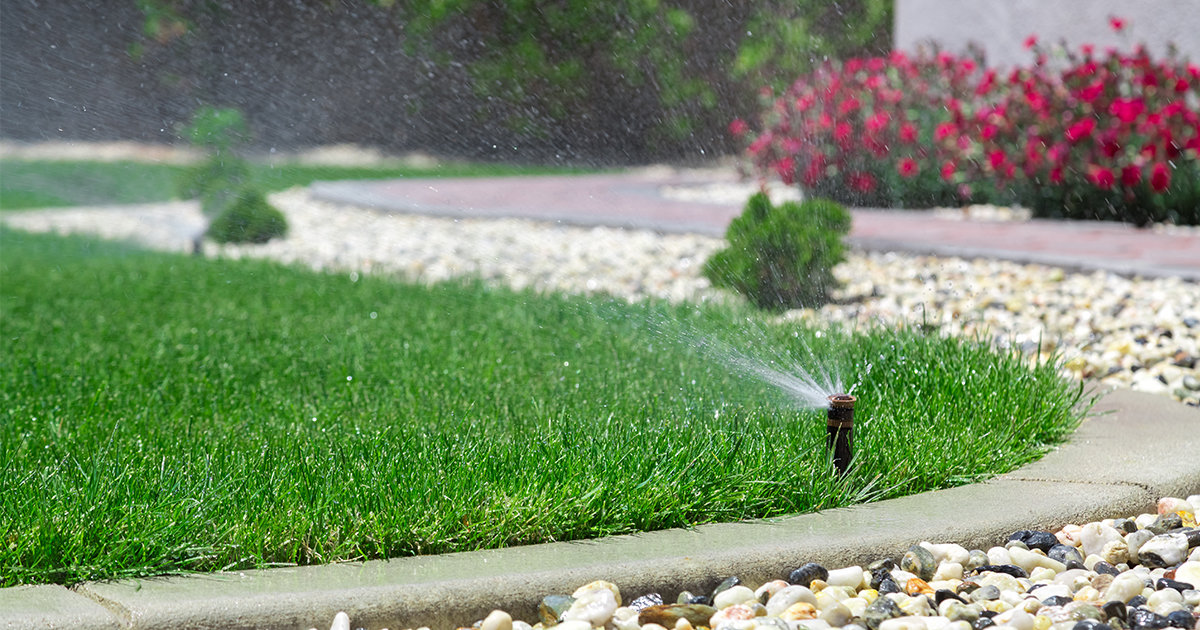
Stationary sprinklers have different spray heads that water only one part of the yard: the surrounding area. This feature makes them ideal for small lawns.
If you have a larger yard, you can use a travelling sprinkler, which is mounted on a portable cart-like structure to be moved around.
An impact sprinkler head can rotate to cover a large area or a small, pie-shaped area, depending on the adjustments made to the sprinkler head. This particular watering system is ideal for watering shrubs, trees, and lawns. However, you will need to make other arrangements for flower beds, because the powerful water stream can damage petals or leaves.
Misting sprinklers, also known as micro-sprinklers, supply small volumes of water to tiny lawn areas. They’re great for irrigating delicate plants that require precise watering techniques. The sprinkler head emits a tiny amount of water every hour and is useful for compacted soil. Misting sprinklers work well with low water pressure, too.
Before you do anything else, shut off the sprinkler valve to prevent any water-related surprises from disrupting your work.
A good place to look for your system’s shut off valve is in the basement or in the crawl space under the house. It should be near ground level, close to piping coming into the home. There should be a single shut off valve, which usually has a lever-type handle. Watch out for a large water pipe coming in well below ground level. This one will be coming through a foundation wall and is most likely your home's main water supply, not the sprinkler system valve.
Sometimes, sprinkler systems are installed with their own valve boxes outside the house. If you can’t find one in the usual spots, look for the valve box around the yard.
Sprinklers usually also have a backflow prevention system installed with them. It’s important so herbicides, pesticides, or lawn fertilizer doesn’t flow into your home’s main water. After shutting off the sprinkler valve, ensure the backflow preventer is tightly closed, too.
Now it’s time to override the automatic settings of your timed mechanism. But before you do that, note down the settings you were using, unless you want to readjust the system altogether.
Turn on the manual cycle. This will help slowly release water to the entire irrigation system when it’s time to turn it back on.
To start off, perform a general health check on the system. This is the time to replace batteries and re-program for new times.
Check your municipality’s website to find out watering times, so you don’t get in trouble with by-law.
Next, do an overall inspection of the pipes if you have access to them. You’re looking for cracks or damage that could leak. If you want, you can repair the pipes using an irrigation system solvent cement. If you’re not sure how to do it, call an expert.
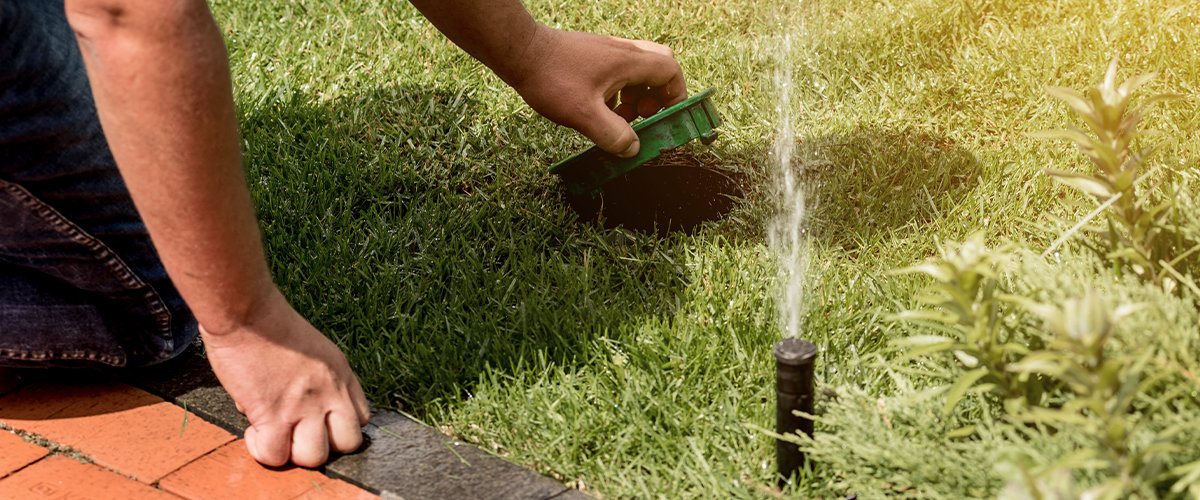
After taking care of the pipes, move to inspecting and replacing any cracked or worn hose grommets. Now is also the time to check the filter screens in spray nozzles, so you can clean or replace them.
Closely inspect all sprinkler heads for debris and damage. If you notice debris, which you likely will, clean it out to allow for proper water flow. Take the sprinkler head off and straighten out a paper clip to use for pushing out any grime or debris.
When you’ve cleaned out the sprinkler heads, put them back on, and checked all pipes, you can begin testing your sprinkler system.
But, wait! Check the soil condition first.
This step will vary regionally. It’s a good idea to perform a pH (measure of hydrogen concentration that indicates acidity or basicity) test on your garden soil before you begin watering. Plants need a good balance of soil pH for optimal growth. Knowing what’s the pH of your yard soil helps determine your gardening regimen for the season.
The ideal time to test for soil pH is during the fall. An early check will give you time to make corrections and apply remedies to heal the soil. But you can also do the testing in spring or summer. However, it will delay your planting activities.
If you start your sprinkler system in early spring, remember, the ground may not have thawed enough yet. If it’s still frozen by a foot or more, you run the risk of cracking an underground pipe.
It’s time to let the water flow, but take it slow. It just takes a few seconds for the system to pressurize so always open the system shut off valve slowly.
High water flow can create a water hammer — it’s a shockwave caused by a sudden change in water flow — that can burst fittings or pop off sprinkler heads.
Start by testing the valve that’s furthest from the water source. Keep it open for a bit to let out air and any debris inside the pipes. Once that’s tested, gradually increase the water pressure and open other sprinklers.
Repeat this process with each valve and watch for anything odd.
Testing a sprinkler system isn’t just about checking how the water is flowing.
You also have to make sure it’s reaching its desired destination. If your sprinkler system is set up to water by zone, tour each one. Malfunctioning sprinkler heads could indicate plumbing problems that will need to be fixed.
Make sure the water reaches the entire zone in which the sprinkler head is placed. Sprinklers shouldn’t be watering the sidewalk, driveway, or other hardscapes. If you have to readjust the direction of your sprinkler heads, go for it.
It’s a good idea to do this inspection monthly to ensure spray heads are working well, spray patterns are consistent, and each nozzle is clean. Regularly surveying your sprinkler system will also help prevent water wastage.
Remember we switched the sprinkler system to manual? Well, you’ve tested that aspect of it, but now you have to make sure it’s working well on a timed schedule, too.
Set a test timer to check if it’s turning on and off accordingly.
You might want to consider investing in a rain/freeze sensor that detects when the lawn has enough moisture. This feature will automatically stop the sprinklers depending on ground wetness. It will also switch off water when it starts to rain. Remember to turn off your timer after you’ve tested the system. You may not need it immediately after trying out the sprinklers.
Put a reminder in your calendar so you can turn it on again. You can adjust settings, if needed, at the beginning of summer to ensure your lawn gets enough water during the dry season.
You will need to change the settings again in August or September, when the weather changes and temperatures drop and days get shorter. Lately, we’ve been seeing dry, hot weather extend beyond a traditional fall as well, so you can play it by ear.
Keep in mind to turn the sprinkler system off completely and winterize it before the first snowfall.
Guidelines for testing times can vary according to how quickly it gets hot where you live.
But a general rule for Canada is to wait until the snow has started to melt before you begin your inspection.
If you want an early kick off, have insulated valves, or know how to drain your backflow prevention device to stop possible freezing damage, start during the first 15 days of April.
If you are on top of your game, you can start the system in the last 15 days of April. You have to monitor temperatures and be ready to wrap your sprinkler system if it gets cold again. Considering it’s Canada, this is likely going to happen.
If you want to avoid a surprise frost and still stay ahead of the dry season, start your sprinklers in early May.
In general, you can be sure there will be no frost after mid-May. But don’t be surprised if it does happen. However, you won’t need to wrap up your sprinkler system if it does.
Installing a professional sprinkler system should be discussed with your landscape designer when you are planning out your backyard makeover.
Contact Premier to setup a no-obligation conversation with our landscape designer today.
Waterloo Office: 620 Colby Drive, Waterloo, ON
London Office: 352 - 341 Talbot Street, London, ON
(519) 500- 5545 [email protected]